Developer Guide

Advisio
Advis.io (AIO) is a all-in-one solution for financial advisors to better manage their clientele and their clients respective policies. AIO is currently available on PC, and is optimized for use via a Command Line Interface (CLI) while still having the benefits of having a Graphical User Interface (GUI). If you can type fast, AIO will be the biggest boost in your productivity that you’ll see in your career.
With AIO, financial advisors of all expertise are able to keep track their ever-growing clientele and always be prepared for the needs of their clients. AIO makes it easier for you to keep track of your clients’ policies and appointment dates, providing them more time for you to focus on expanding your network and providing the best service for your beloved clients.
Table of Contents
- Acknowledgements
- Setting up, getting started
- Design
- Implementation
- Documentation
- Appendix: Requirements
- Appendix: Instructions for manual testing
- Appendix: Efforts
- Appendix: Planned Enhancements
Acknowledgements
- Adapted from AB3
Setting up, getting started
Refer to the guide Setting up and getting started.
Design
.puml files used to create diagrams in this document can be found in
the diagrams folder. Refer to the PlantUML
Tutorial at se-edu/guides to learn how to create and edit
diagrams.
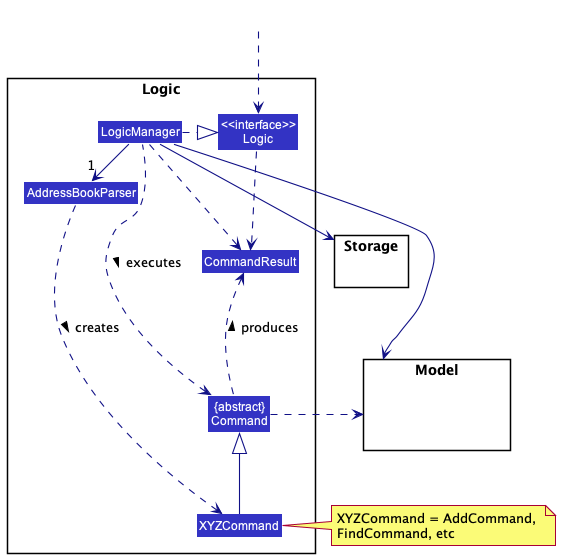
Architecture
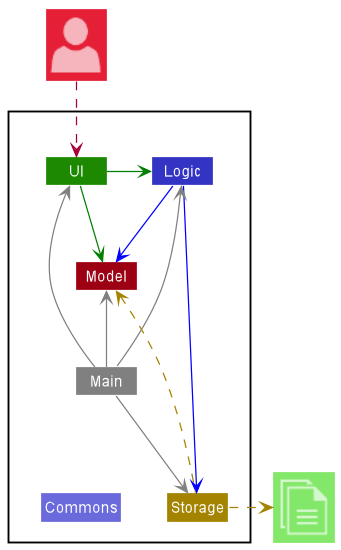
The Architecture Diagram given above explains the high-level design of the App.
Given below is a quick overview of main components and how they interact with each other.
Main components of the architecture
Main has two classes
called Main
and MainApp. It
is responsible for,
- At app launch: Initializes the components in the correct sequence, and connects them up with each other.
- At shut down: Shuts down the components and invokes cleanup methods where necessary.
Commons represents a collection of classes used by multiple other components.
The rest of the App consists of four components.
-
UI: The UI of the App. -
Logic: The command executor. -
Model: Holds the data of the App in memory. -
Storage: Reads data from, and writes data to, the hard disk.
How the architecture components interact with each other
The Sequence Diagram below shows how the components interact with each other for the scenario where the user issues
the command delete 1.
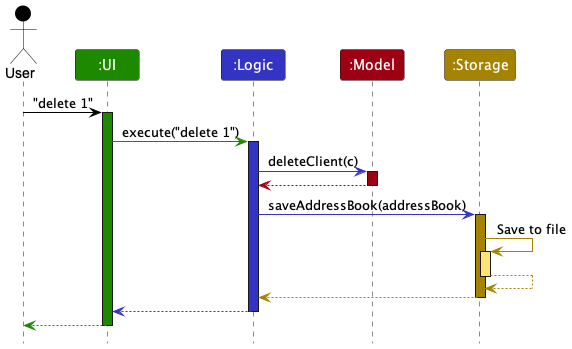
Each of the four main components (also shown in the diagram above),
- defines its API in an
interfacewith the same name as the Component. - implements its functionality using a concrete
{Component Name}Managerclass (which follows the corresponding APIinterfacementioned in the previous point).
For example, the Logic component defines its API in the Logic.java interface and implements its functionality using
the LogicManager.java class which follows the Logic interface. Other components interact with a given component
through its interface rather than the concrete class (reason: to prevent outside component’s being coupled to the
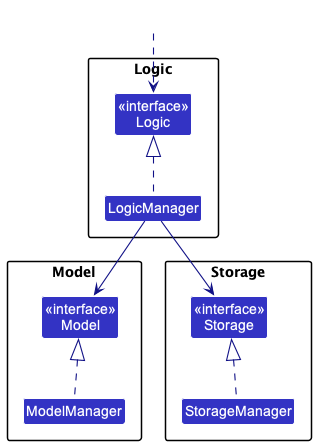
implementation of a component), as illustrated in the (partial) class diagram below.
The sections below give more details of each component.
UI component
- API
Ui.java
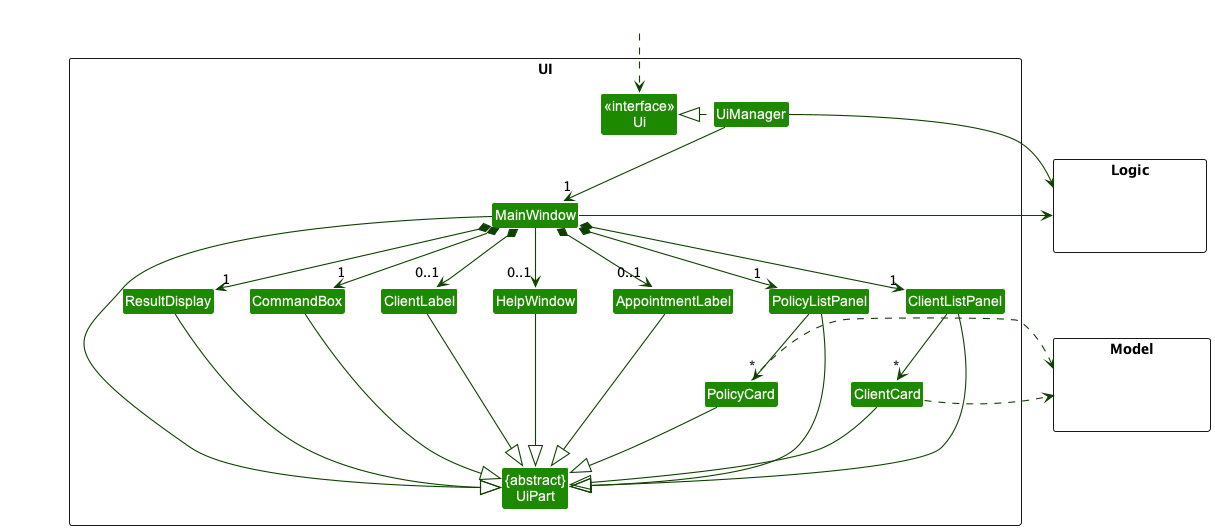
The UI consists of a MainWindow that is made up of parts
e.g.CommandBox, ResultDisplay, ClientListPanel, PolicyListPanel etc. All these, including the MainWindow,
inherit from the abstract UiPart class which captures the commonalities between classes that represent parts of the
visible GUI.
The UI component uses the JavaFx UI framework. The layout of these UI parts are defined in matching .fxml files that
are in the src/main/resources/view folder. For example, the layout of
the MainWindow
is specified
in MainWindow.fxml
The UI component,
- executes user commands using the
Logiccomponent. - listens for changes to
Modeldata so that the UI can be updated with the modified data. - keeps a reference to the
Logiccomponent, because theUIrelies on theLogicto execute commands. - depends on some classes in the
Modelcomponent, as it displaysClientobject residing in theModel.
The Sequence Diagram below illustrates the interactions within the Ui component for the start(primaryStage) API
call.

MainWindow
The MainWindow controller class is composed of the following classes:
HelpWindowClientListPanelPolicyListPanelClientResultDisplay
The UiManager controller class contains the start method which follows the sequence:
- Instantiate a new
MainWindowobject. -
showtheMainWindowobject. - Populate the subcomponents with the
fillInnerPartsmethod.
The MainWindow#fillInnerParts method is as follows:
- Populate the
clientListPanel. - Populate the
policyListPanel - Populate the
resultDisplay. - Populate the
commandBox.
ClientLabel
The ClientLabel is composed of the labels: name, id, phone, address, email, tags which display the
information of the Client.
ClientListPanel
The ClientListPanel contains a clientListView:ListView<Client> to store the most updated list of Client objects.
The
constructor method takes in an ObservableList<Client> and sets it into the clientListView.
Each Client in the ObservableList<Client> is mapped to a ClientListViewCell which extends a ListCell<Client>.
This ClientListViewCell overides the ListCell<T>#updateItem method to register any changes made to a Client
within the Model and reflects it onto the UI.
PolicyListPanel
The PolicyListPanel works similarly to the ClientListPanel. The PolicyListPanel contains a
policyListView:ListView<Client> to store the most updated list of Policy objects. The constructor takes in an
ObservableList<Policy> and sets it into the policyListView.
Each Policy in the ObservableList<Policy> is mapped to a PolicyListViewCell which extends a ListCell<Policy>.
This PolicyListViewCell overides the ListCell<T>#updateItem method to register any changes made to a Policy
within the Model and reflects it onto the UI.
Design considerations:
Preview of the UI design.
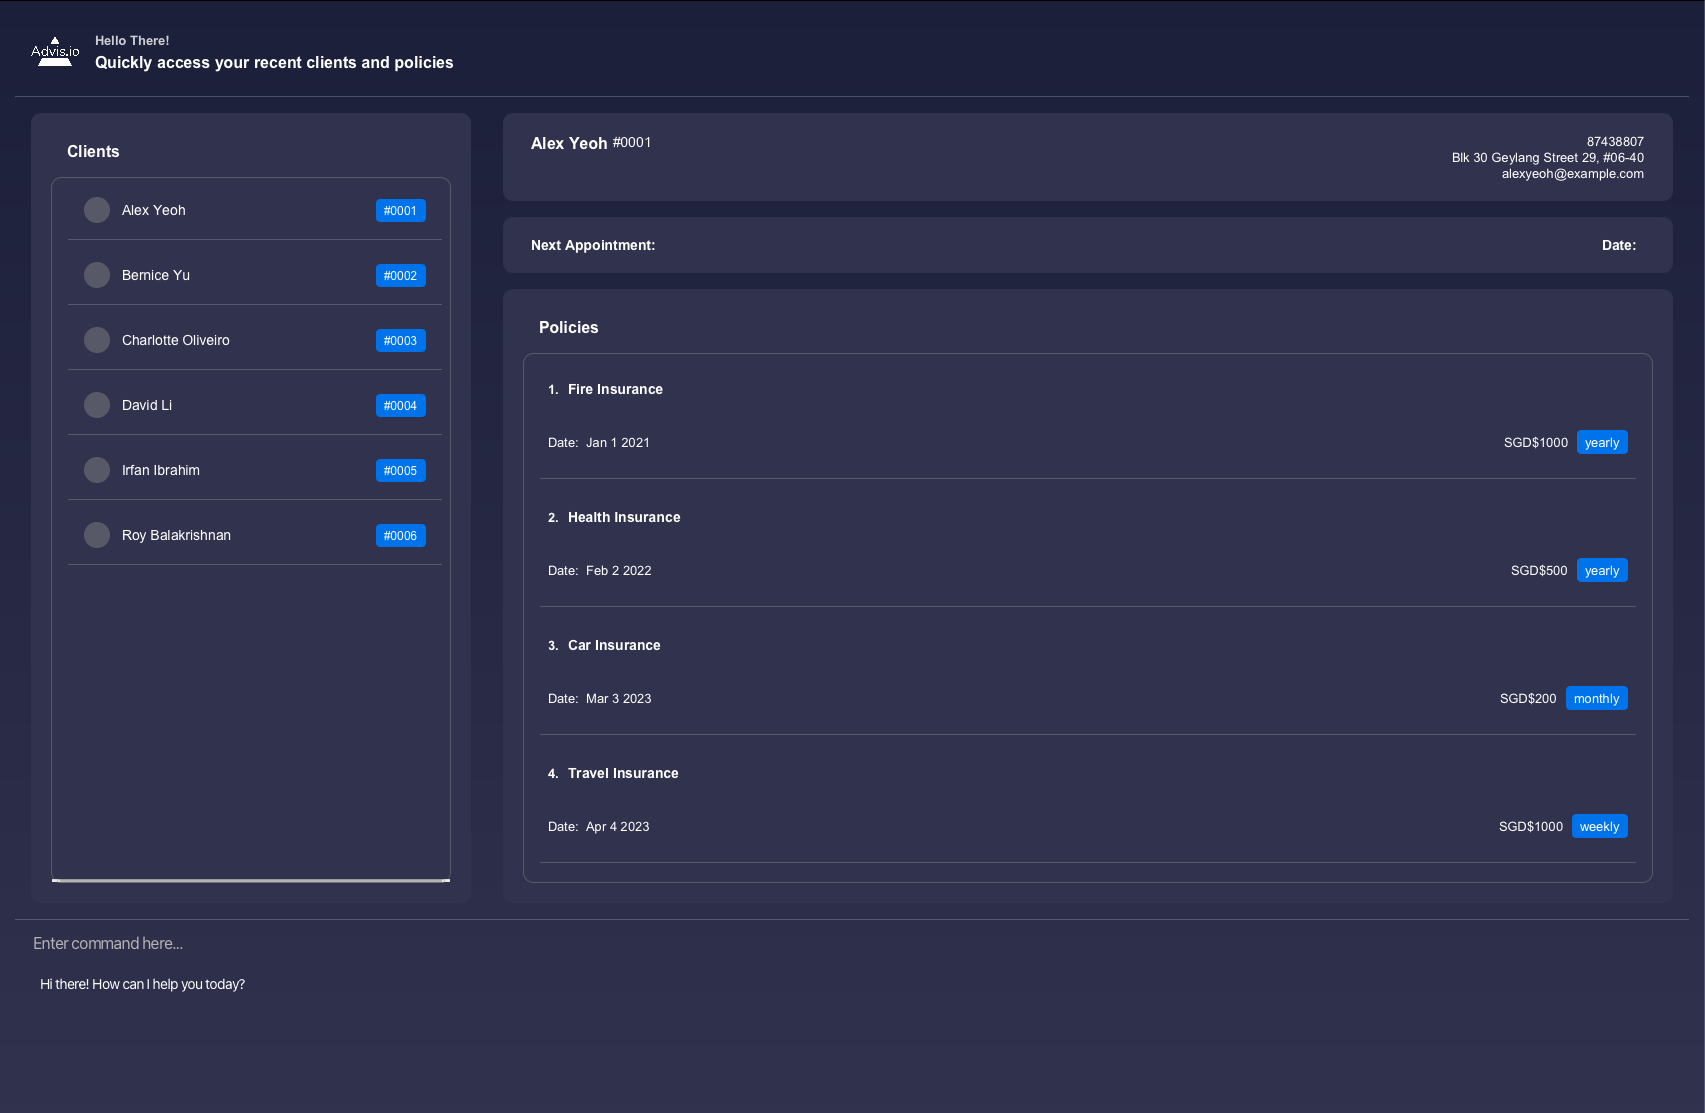
The UI follows a simple dashboard layout with list panels to display the Clients, selected Clients, and the Policies of the selected Clients. This layout was done such that the user would have quick and easy access to detailed information of each of their Clients.
Each Client is labeled with a hashcode identifier, which can be used to select the Client for spotlighting.
We chose to limit the information shown on the Client list so that the user can have a wide overview of their list of clientele. Since selecting each Client is conducted in a short and simple command, users may browse through each client quickly.
Having a separate panel to display the Client information and Policies enables users to present the information clearly to their clients.
Alternatives considered:
- We considered keeping to a consolidated panel where each
ClientCardwould display the client information as well as their list ofPolicyCard. However, we found this design to be overwhelming and did not provide a layout that was quick and easy to comprehend.
Logic component
- API
Logic.java
Here’s a (partial) class diagram of the Logic component:
How the Logic component works:
- When
Logicis called upon to execute a command, it uses theAddressBookParserclass to parse the user command. - This results in a
Commandobject (more precisely, an object of one of its subclasses e.g.,AddCommand) which is executed by theLogicManager. - The command can communicate with the
Modelwhen it is executed (e.g. to add a person). - The result of the command execution is encapsulated as a
CommandResultobject which is returned back fromLogic.
The Sequence Diagram below illustrates the interactions within the Logic component for the execute("delete 1") API
call.
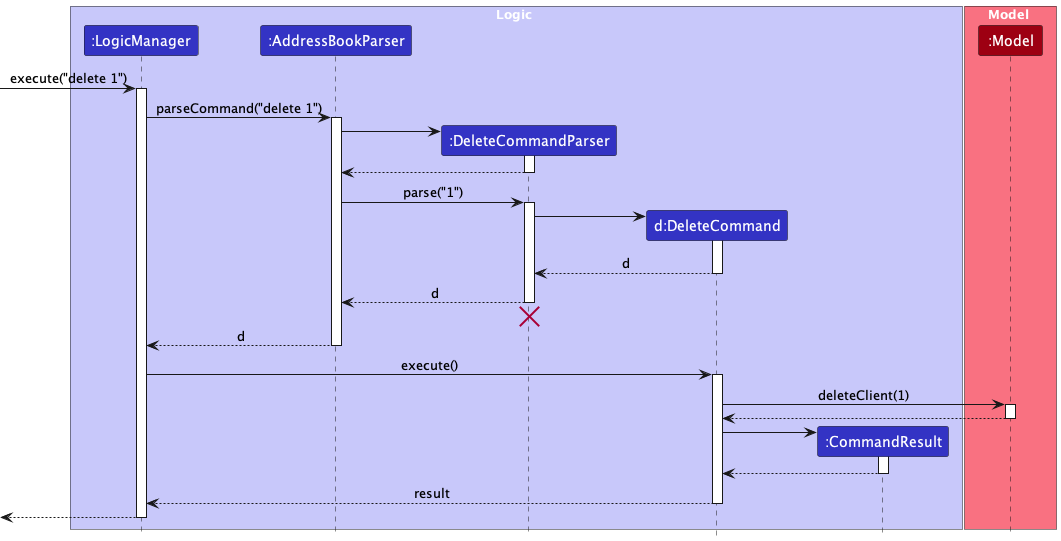
DeleteCommandParser should end at the destroy marker (X) but due to a limitation of PlantUML, the lifeline reaches the end of diagram.
Here are the other classes in Logic (omitted from the class diagram above) that are used for parsing a user command:
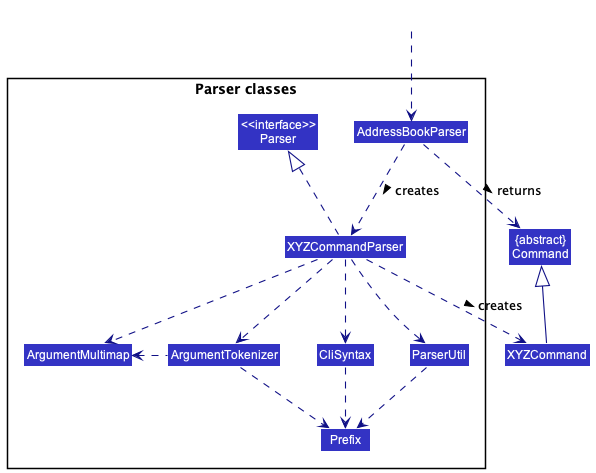
How the parsing works:
- When called upon to parse a user command, the
AddressBookParserclass creates anXYZCommandParser(XYZis a placeholder for the specific command name e.g.,AddCommandParser) which uses the other classes shown above to parse the user command and create aXYZCommandobject (e.g.,AddCommand) which theAddressBookParserreturns back as aCommandobject. - All
XYZCommandParserclasses (e.g.,AddCommandParser,DeleteCommandParser, …) inherit from theParserinterface so that they can be treated similarly where possible e.g, during testing.
Model component
- API
Model.java
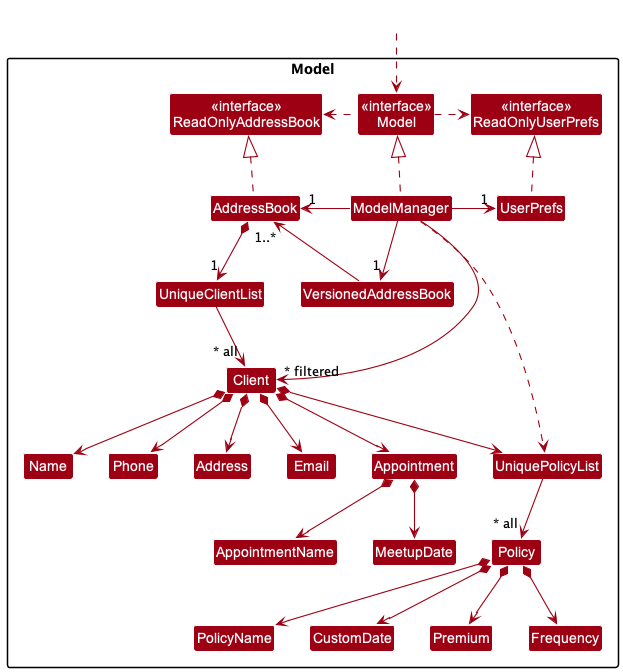
The Model component,
- stores the address book data i.e., all
Clientobjects (which are contained in aUniqueClientListobject). - stores the currently ‘selected’
Clientobjects (e.g., results of a search query) as a separate filtered list which is exposed to outsiders as an unmodifiableObservableList<Client>that can be ‘observed’ e.g. the UI can be bound to this list so that the UI automatically updates when the data in the list change. - stores a
UserPrefobject that represents the user’s preferences. This is exposed to the outside as aReadOnlyUserPrefobjects. - stores the previous address book data after modifying data in the
AddressBookthrough the use of Linked List inVersionedAddressBook. - does not depend on any of the other three components (as the
Modelrepresents data entities of the domain, they should make sense on their own without depending on other components).
The Client component,
- Contains 6 classes :
Name,Phone,Address,Email,UniquePolicyList,Appointment - All
Policyobjects are stored in aUniquePolicyListobject, similar toUniqueClientListobject. - Stores the currently ‘selected’
Policyobjects as a separate filtered list which is exposed to outsiders as an unmodifiableObservableList<Policy>that can be ‘observed’ e.g. the UI can be bound to this list so that the UI automatically updates when the data in the list change.
Alternative considered:
- Considered using simple
ArrayList<Policy>to store allPolicyobjects, but it would make UI’s automatic updates access harder. - Instead of treating each object in a
Policyas a string,CustomDateis in the form of aLocalDateclass, whilePremiumis in the form ofdouble. This allows for future addition of features such as sorting, finding or aggregating of specific data.
Tag list in the AddressBook, which Client references. Likewise, it has a Policy list in the AddressBook, which Client can reference. This allows AddressBook to only require one Tag object per unique tag and one Policy object per unique policy, instead of each Client needing their own Tag and Policy objects.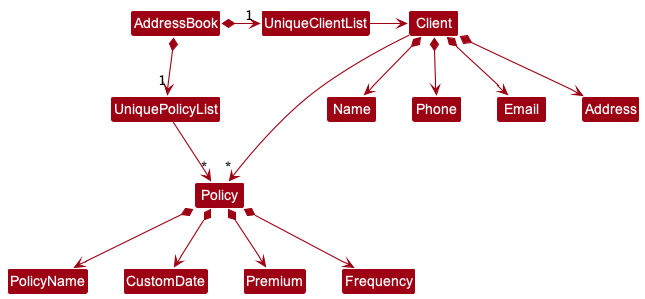
Storage component
- API
Storage.java
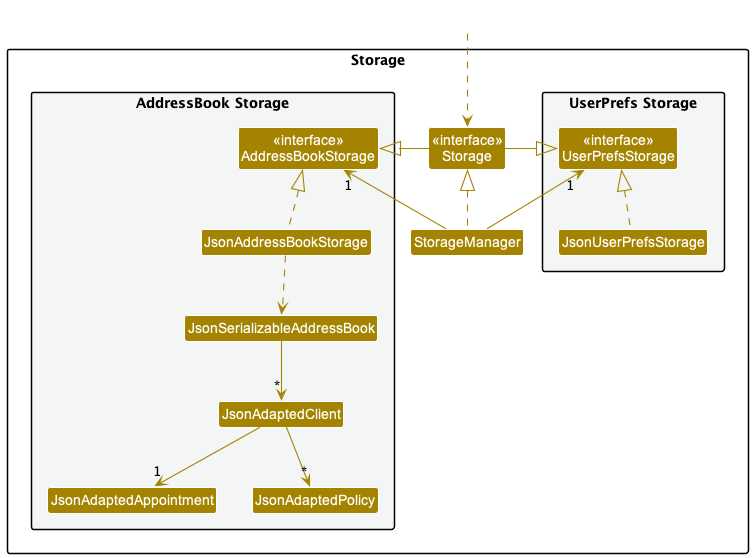
The Storage component,
- can save both address book data and user preference data in json format, and read them back into corresponding objects.
- inherits from both
AddressBookStorageandUserPrefStorage, which means it can be treated as either one (if only the functionality of only one is needed). - depends on some classes in the
Modelcomponent (because theStoragecomponent’s job is to save/retrieve objects that belong to theModel)
Common classes
Classes used by multiple components are in the seedu.addressbook.commons package.
Implementation
This section describes some noteworthy details on how certain features are implemented.
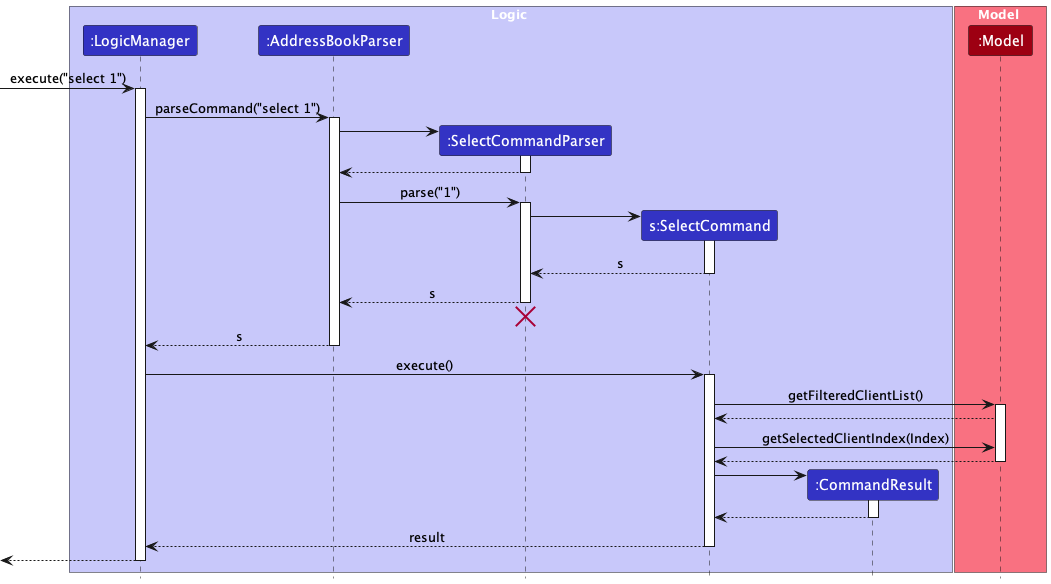
Select Feature
The select mechanism is facilitated by SelectCommand and SelectCommandParser.
SelectCommand extends from Command by overriding methods from its parent class.
The logic of this class follows the sequence.
- Get the
Clientbased on the most updated client list in theModel. - The selected
Clientproduced by theCommandResultis passed to theMainWindowcontroller class. -
ClientLabelis updated with the selectedClientand thePolicyListPlaceholderis populated with itsPolicyCards
SelectCommandParser implements Parser<SelectCommand>.
The logic of this class follows this sequence.
- Get the client index from the preamble of the input.
The following sequence diagram shows how the select operation works:
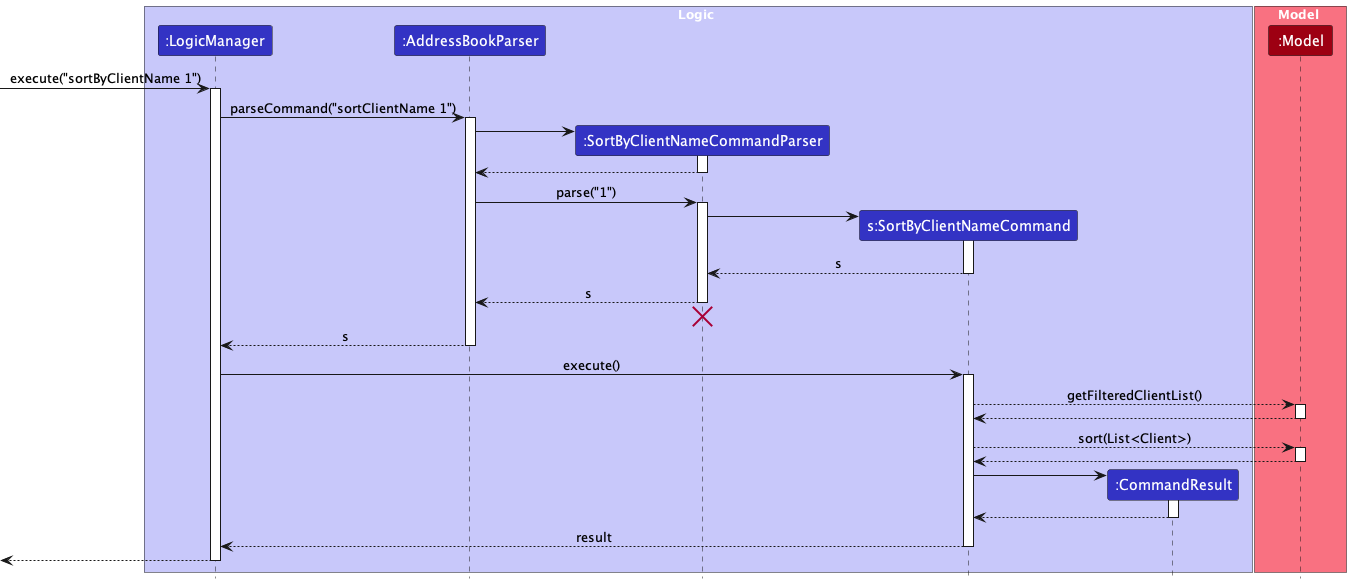
Sort Feature
There are three sorting features available.
SortByClientNameSortByClientEmailSortByClientPhone
Their mechanisms are similar. So only take SortByClientName as an example
The SortByClientName mechanism is facilitated by SortByClientNameCommand
and SortByClientNameCommandParser.
SortByClientNameCommand extends from sortCommand by overriding methods from its parent class.
The logic of this class follows the sequence.
- Get the most updated client list in the
Model. - Sort the list based on given
INDEXdetails. - Updated the new sorted client List in the
Model.
SortByClientNameCommandParser implements Parser<SortByClientNameCommand>.
The logic of this class follows this sequence.
- Get the instruction index from the preamble of the input
The following sequence diagram shows how the sort operation works:
Add Policy Feature
The add policy mechanism is facilitated by AddPolicyCommand and AddPolicyCommandParser.
AddPolicyCommandParser implements Parser<AddPolicyCommand>. AddPolicyCommandParser#parse() is exposed in
the Parser interface as Parser#parse() and the logic of this method follows the sequence.
- Get the client index from the preamble of the input.
- Get the policy details from the prefix
pn/,pd/,pp/,pf/, which are the Policy Name, Policy Date, Policy Premium, and Policy Frequency respectively.
AddPolicyCommand extends from Command by overriding methods from its parent class. AddPolicyCommand#execute()
logic of this method follows the sequence.
-
Model#getFilteredClientList(): Get theClientbased on the most updated client list in theModel. - Create a new
Policybased on the givenPolicydetails. -
Model#setClient(Client, Client): Add thePolicyto theClientgiven, and update theClientin theModel.
Example usage: To add a policy to a client
-
Select 1: selects the client at index 1 in the given client list. -
addPolicy 1 pn/Travel Insurance pd/01.01.2024 pp/1000 pf/yearly: Adds a policy to client indexed at 1.
The sequence diagram for the add policy operation works similarly to how the delete policy operation works over here
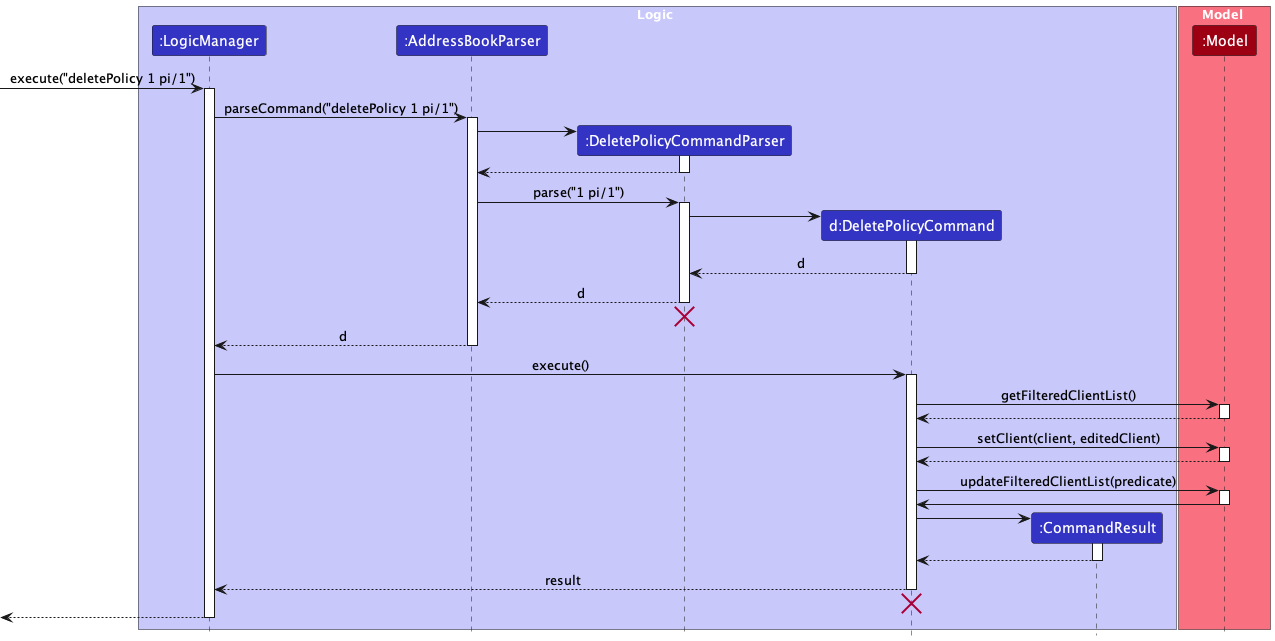
Delete Policy feature
The delete policy mechanism is facilitated by DeletePolicyCommand and DeletePolicyCommandParser. The feature is
implemented by getting the client index and the policy index in their respective list in the application. Once given, we
will retrieve the Client object from the model. Given the Clientobject we will retrieve the policies associated to
this Client and remove the policy based on the index given.
These classes are implemented this way because, like other commands, such as DeleteCommand we first have to retrieve
the client list followed by executing the delete feature.
DeletePolicyCommandParser implements Parser<DeletePolicyCommand>. DeletePolicyCommandParser#parse() is exposed in
the Parser interface as Parser#parse() and the logic of this class follows the sequence.
- Get the client index from the preamble of the input.
- Get the policy index from the prefix
pi/.
DeletePolicyCommand extends from Command by overriding methods from its parent
class. DeletePolicyCommand#execute() logic of this method follows the sequence.
-
Model#getFilteredClientList(): Get theClientbased on the most updated client list in theModel. -
Model#setClient(Client, Client): Delete thePolicyassociated to the givenPolicyindex from theClientgiven.
The following sequence diagram shows how the delete policy operation works:
Alternatives Considered:
- We considered if we could receive the policies from the model instead of the client.
- We also considered to execute a
SelectCommandin the process ofDeleteCommandso that the user will automatically move to the targeted client that he or she wishes to delete a policy from.
Edit Policy feature
The edit policy mechanism is facilitated by EditPolicyCommand and EditPolicyCommandParser. The feature is
implemented by getting the client index and the policy index in their respective list in the application. Once given, we
will retrieve the Client object from the model. Given the Client object we will retrieve the policies associated to
this Client and edit the policy based on the user input given.
These classes are implemented this way because, like other commands, such as EditCommand we first have to retrieve the
client list followed by executing the edit feature.
EditPolicyCommandParser implements Parser<EditPolicyCommand>. EditPolicyCommandParser#parse() is exposed in
the Parser interface as Parser#parse() and the logic of this class follows the sequence.
- Get the client index from the preamble of the input.
- Get the policy index from the prefix
pi/. - Get the policy name from the prefix
pn/, policy start date from the prefixpd/, policy premium from the prefixpf/, policy frequency from the prefixpf/
EditPolicyCommand extends from Command by overriding methods from its parent class. EditPolicyCommand#execute()
logic of this class follows the sequence.
-
Model#getFilteredClientList(): Get theClientbased on the most updated client list in theModel. - Edit the
Policyassociated to the givenPolicyindex from theClientgiven. -
Model#setClient(Client, Client): ThePolicyis edited based on the prefixes given by the user input.
PolicyName, CustomDate, Premium and Frequency are completely optional.
The sequence diagram for the edit policy operation works similarly to how the delete policy operation works over here
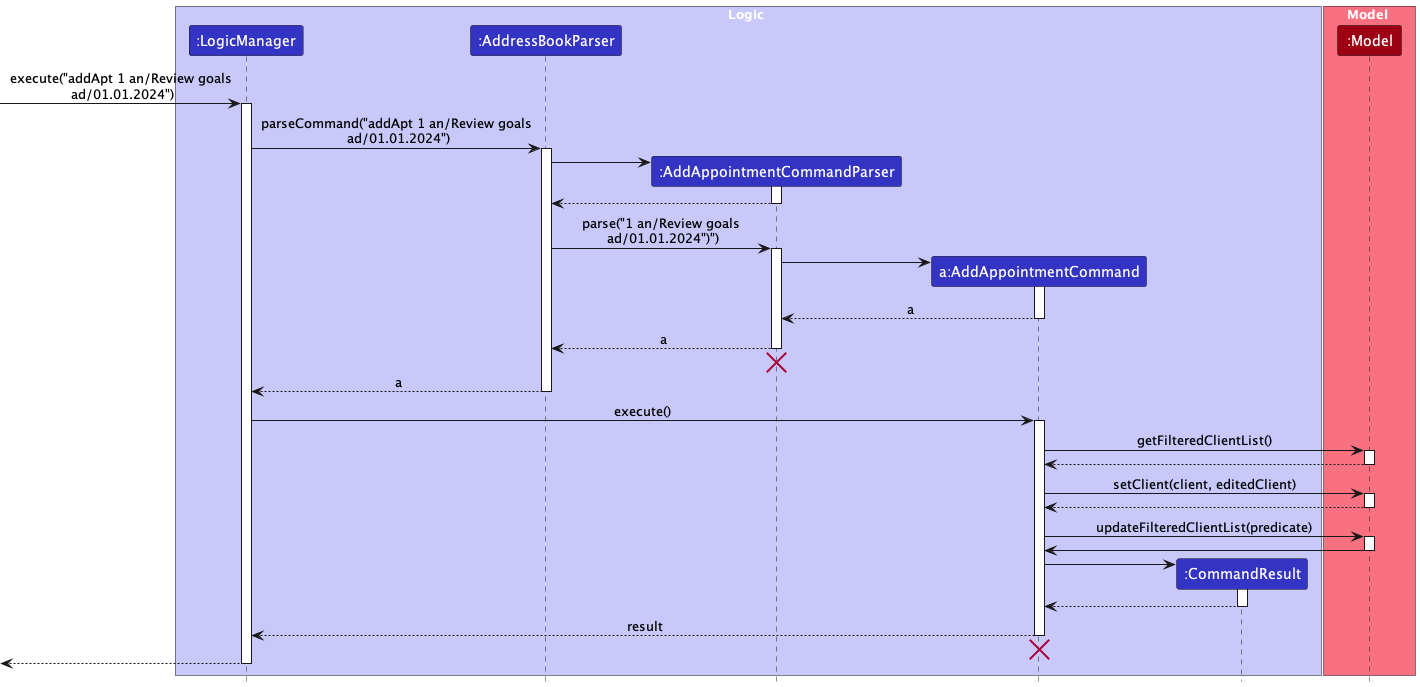
Add Appointment feature
The add appointment mechanism is facilitated by AddAppointmentCommand and AddAppointmentCommandParser.
AddAppointmentCommandParser implements Parser<AddAppointmentCommand>. AddAppointmentCommandParser#parse() is
exposed in the Parser interface as Parser#parse() and the logic of this method follows the sequence.
- Get the client index from the preamble of the input.
- Get the appointment details from the prefix
an/,ad/, which represents theAppointmentNameandMeetupDateclasses respectively.
AddAppointmentCommand extends from Command by overriding methods from its parent
class. AddAppointmentCommand#execute() logic of this method follows the sequence.
-
Model#getFilteredClientList(): Get theClientbased on the most updated client list in theModel - Create a new
Appointmentbased on the givenAppointmentdetails -
Model#setClient(Client, Client): Add theAppointmentto theClientgiven, and update theClientin theModel.
The following sequence diagram shows how the add appointment operation works:
Delete Appointment feature
The delete appointment mechanism is facilitated by DeleteAppointmentCommand and DeleteAppointmentCommandParser.
DeleteAppointmentCommandParser implements Parser<DeleteAppointmentCommand>. DeleteAppointmentCommandParser#parse()
is exposed in the Parser interface as Parser#parse() and the logic of this method follows the sequence.
- Get the client index from the preamble of the input.
DeleteAppointmentCommand extends from Command by overriding methods from its parent
class. DeleteAppointmentCommand#execute() logic of this method follows the sequence.
-
Model#getFilteredClientList(): Get theClientbased on the most updated client list in theModel -
Model#setClient(Client, Client): Delete theAppointmentfrom theClientgiven, and update theClientin theModel.
The sequence diagram for the delete appointment operation works similarly to how the add policy operation works over here. The only difference are the name of the classes and the parameter passed into the methods.
Undo/redo feature
Implementation
The undo/redo mechanism is facilitated by VersionedAddressBook. It stored internally as an addressBookStateList
and currentStatePointer. Additionally, it implements the
following operations:
-
VersionedAddressBook#commit()— Saves the current address book state in its history. -
VersionedAddressBook#undo()— Restores the previous address book state from its history. -
VersionedAddressBook#redo()— Restores a previously undone address book state from its history. -
VersionedAddressBook#canUndo()- Returns true if undo is possible -
VersionedAddressBook#canRedo()- Returns true if redo is possible
These operations are exposed in the Model interface as Model#commitAddressBook(), Model#undoAddressBook()
and Model#redoAddressBook() respectively.
Given below is an example usage scenario and how the undo/redo mechanism behaves at each step.
Step 1. The user launches the application for the first time. The VersionedAddressBook will be initialized with the
initial address book state, and the currentStatePointer pointing to that single address book state.
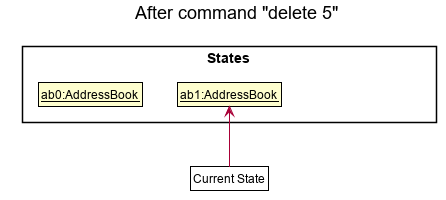
Step 2. The user executes delete 5 command to delete the 5th person in the address book. The delete command
calls Model#commitAddressBook(), causing the modified state of the address book after the delete 5 command executes
to be saved in the addressBookStateList, and the currentStatePointer is shifted to the newly inserted address book
state.
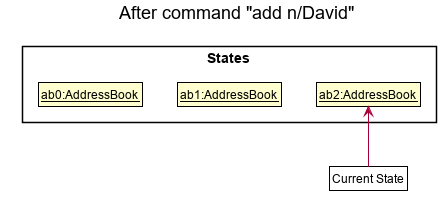
Step 3. The user executes add n/David … to add a new person. The add command also
calls Model#commitAddressBook(), causing another modified address book state to be saved into
the addressBookStateList.
Model#commitAddressBook(), so the address book state will not be saved into the addressBookStateList.
Step 4. The user now decides that adding the person was a mistake, and decides to undo that action by executing
the undo command. The undo command will call Model#undoAddressBook(), which will shift the currentStatePointer
once to the left, pointing it to the previous address book state, and restores the address book to that state.
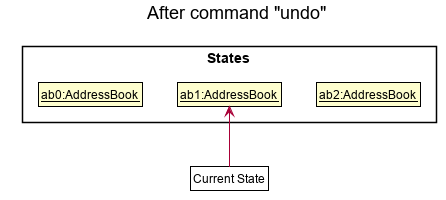
currentStatePointer is at index 0, pointing to the initial AddressBook state, then there are no previous AddressBook states to restore. The undo command uses Model#canUndoAddressBook() to check if this is the case. If so, it will return an error to the user rather
than attempting to perform the undo.
The following sequence diagram shows how the undo operation works:

UndoCommand should end at the destroy marker (X) but due to a limitation of PlantUML, the lifeline reaches the end of diagram.
The redo command does the opposite — it calls Model#redoAddressBook(), which shifts the currentStatePointer once
to the right, pointing to the previously undone state, and restores the address book to that state.
currentStatePointer is at index addressBookStateList.size() - 1, pointing to the latest address book state, then there are no undone AddressBook states to restore. The redo command uses Model#canRedoAddressBook() to check if this is the case. If so, it will return an error to the user rather than attempting to perform the redo.
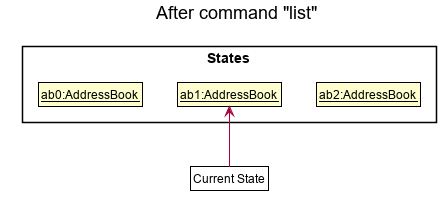
Step 5. The user then decides to execute the command list. Commands that do not modify the address book, such
as list, will usually not call Model#commitAddressBook(), Model#undoAddressBook() or Model#redoAddressBook().
Thus, the addressBookStateList remains unchanged.
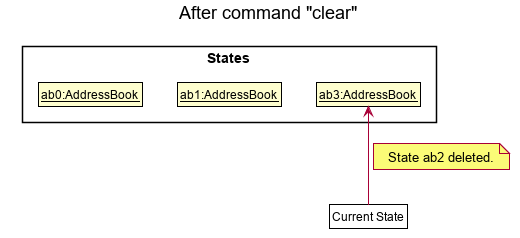
Step 6. The user executes clear, which calls Model#commitAddressBook(). Since the currentStatePointer is not
pointing at the end of the addressBookStateList, all address book states after the currentStatePointer will be
purged. Reason: It no longer makes sense to redo the add n/David … command. This is the behavior that most modern
desktop applications follow.
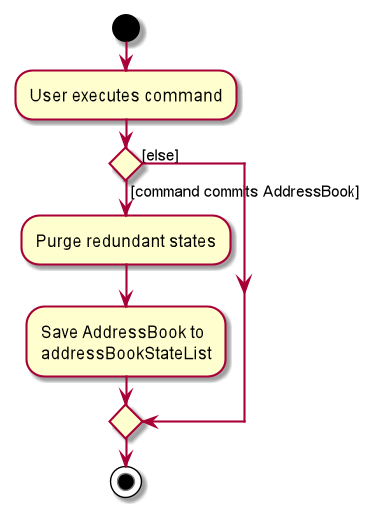
The following activity diagram summarizes what happens when a user executes a new command:
Design considerations:
Aspect: How undo & redo executes:
-
current choice: Saves the entire address book.
- Pros: Easy to implement.
- Cons: May have performance issues in terms of memory usage.
Issue: Pass by reference:
-
what: You may find previous versions of Address Books stored in
VersionedAddressBook#addressBookStateListare changed also when current addressBook are being updated. -
Why:
- Objects (eg. Client, Policy) are passed by reference
- Objects are not deep copied.
-
How to solve:
- Implement clone method for objects (
Client#cloneClientandUniquePolicyList#cloneare already implemented) - When commands are making changes to Address Book in model, make sure changes are only made upon new deep copied objects.
- Don’t directly make changes on original objects (e.g. Client and Policy)
- Implement clone method for objects (
[Proposed] Aggregated data feature
Various aggregated data such as total number of clients, total earnings for the user from all the clients, will be displayed and updated automatically.
Documentation, logging, testing, configuration, dev-ops
Appendix: Requirements
Product scope
Target user profile:
- For student financial advisors managing a growing client base
- Need to keep track of individual client information
- Need to keep track of clients’ policies
- Need to keep track of clients’ appointments
- Prefer desktop apps over other types
- Can type fast
- Prefers typing to mouse interactions
- Is reasonably comfortable using CLI apps
Value proposition:
- Provide a way to view all clients’ records easily and compare and analyze their financial information.
- Keep track of client information such as financial goals and current financial status through the use of policies
- Make it easier to remind financial advisors on follow-up tasks and future advising sessions.
- Personalized recommendations: propose personalized financial advice and recommendations tailored to the student’s unique needs and circumstances
User stories
Priorities: High (must have) - * * *, Medium (nice to have) - * *, Low (unlikely to have) - *
[Epic] As a financial advisor, I can easily find my client
| Priority | As a … | I can … | So that I can… |
|---|---|---|---|
*** |
As a financial advisor | easily search for clients by name or other criteria | quickly access their information |
[Epic] As a financial advisor, I can manage my client’s financial goals
| Priority | As a … | I can … | So that I can… |
|---|---|---|---|
*** |
As a financial advisor | create and store client profiles | easily access their information |
*** |
As a financial advisor | view all my clients’ financial information in one place | make comparisons and analyze their financial status |
*** |
As a financial advisor | add and update client financial goals | have a clear understanding of their objectives |
*** |
As a financial advisor | remove client’s information from my client list | have a well-updated contact list |
** |
As a financial advisor | track my client interactions and notes | have a clear history of my advising sessions |
[Epic] As a financial advisor, I can manage my client investment and insurance plans
| Priority | As a … | I can … | So that I can… |
|---|---|---|---|
*** |
As a financial advisor | keep track of my clients’ investment and insurance plans | provide relevant advice |
*** |
As a financial advisor | input my clients’ insurance and investment plans | ensure they have adequate coverage and help them find more cost-effective options if needed |
*** |
As a financial advisor | remove my client’s insurance and investment plans | have a well-updated plan list |
[Epic] As a financial advisor, I can create reminders for myself and clients
| Priority | As a … | I can … | So that I can… |
|---|---|---|---|
*** |
As a financial advisor | set reminders for follow-up tasks and future advising sessions | don’t miss any important appointments |
General
| Priority | As a … | I can … | So that I can… |
|---|---|---|---|
** |
As a financial advisor | generate reports on client financial information | analyze trends and make informed decisions |
** |
As a financial advisor | share client information with colleagues | collaborate and provide the best advice. |
*** |
As a financial advisor | store client financial documents securely | ensure their sensitive information is protected |
** |
As a financial advisor | access the platform on any device | manage my clients’ information on any device that supports the platform |
* |
As a financial advisor | create custom categories for client information | I can organize and categorize their data in a way that makes sense to me |
** |
As a financial advisor | view a summary of my clients’ overall financial health | I can quickly assess their current situation and make recommendations |
Novice
| Priority | As a … | I can … | So that I can… |
|---|---|---|---|
*** |
As a financial advisor | view clients’ information in a visual and intuitive format | quickly understand their financial situation and recommend a plan of action |
*** |
As a financial advisor | track my clients’ policies performance | monitor the success of my advice and identify areas for improvement. |
Expert
| Priority | As a … | I can … | So that I can… |
|---|---|---|---|
** |
As a financial advisor | customize the financial planning software to fit my specific advising methodologies | provide clients with the best possible advice |
Use cases
(For all use cases below, the System is Advis.io and the Actor is the user (Financial Advisor), unless
specified otherwise)
Use case: Add a new client’s personal information
MSS
- User inputs the client’s personal information
-
Advis.io confirms and creates the client profile
Use case ends.
Extensions
- 1a. The user inputs the wrong format for the client’s information.
- 1a1. Advis.io requests for the user to input the correct data format.
-
1a2. User inputs correct data
Steps 1a1-1a2 are repeated until the data entered are correct.
Use case resumes from step 2.
Use case: Edit a client’s personal information
MSS
- User inputs the client’s index and modified personal information
-
Advis.io confirms and modifies the client profile
Use case ends.
Extensions
- 1a. The user inputs the wrong format for the client’s information.
- 1a1. Advis.io requests for the user to input the correct data format.
-
1a2. User inputs correct data
Steps 1a1-1a2 are repeated until the data entered are correct.
Use case resumes from step 2.
- 1b. The user inputs an invalid client index
- 1b1. Advis.io displays a message indicating that the client index is invalid.
-
1b2. User inputs another client index with the modified information
Steps 1b1-1b2 are repeated until the data entered are correct.
Use case resumes from step 2.
Use case: Delete a client
MSS
- User inputs the delete command and the index of the client to delete.
-
Advis.io confirms and deletes the client profile
Use case ends.
Extensions
- 1a. The user inputs an invalid client index
- 1a1. Advis.io displays a message indicating that the client index is invalid.
-
1a2. User inputs another client index.
Steps 1a1-1a2 are repeated until the data entered are correct.
Use case resumes from step 2.
Use case: Add client’s policy information
MSS
- User inputs the client’s policy information
-
Advis.io confirms and creates the policy under the client’s profile
Use case ends.
Extensions
- 1a. The user inputs the wrong format for the policy’s information.
- 1a1. Advis.io requests for the user to input the correct data format.
-
1a2. User inputs correct data
Steps 1a1-1a2 are repeated until the data entered are correct.
Use case resumes from step 2.
Use case: Edit client’s policy information
MSS
- User inputs the client’s policy index and modified policy information
-
Advis.io confirms and modifies the policy under the client’s profile
Use case ends.
Extensions
- 1a. The user inputs the wrong format for the policy’s information.
- 1a1. Advis.io requests for the user to input the correct data format.
-
1a2. User inputs revised data
Steps 1a1-1a2 are repeated until the data entered are correct.
Use case resumes from step 2.
- 1b. The user inputs an invalid client or policy index
- 1b1. Advis.io displays a message indicating that the client or policy index is invalid.
-
1b2. User inputs another client or policy index with the modified information
Steps 1b1-1b2 are repeated until the data entered are correct.
Use case resumes from step 2.
Use case: Delete a client’s policy
MSS
- User inputs the delete command and the index of the client and policy to delete.
-
Advis.io confirms and deletes the policy under the client’s profile
Use case ends.
Extensions
- 1a. The user inputs an invalid client or policy index
- 1a1. Advis.io displays a message indicating that the client or policy index is invalid.
-
1a2. User inputs another client or policy index.
Steps 1a1-1a2 are repeated until the data entered are correct.
Use case resumes from step 2.
Use case: Find Client
MSS
- The user enters the name, phone number or any other identifying information of the client.
- Advis.io searches for the client based on the entered information.
- Advis.io displays a list of clients matching the entered information.
- The user selects the desired client from the list.
-
Advis.io displays the client’s information and policy details.
Use case ends.
Extensions
- 2a. Advis.io does not find any clients matching the entered information.
- 2a1. Advis.io displays a message indicating that no clients were found.
-
2a2. The user enters another search query with another set of information.
Steps 2a1-2a2 are repeated until the user enters a valid search query.
Use case resumes from step 3.
Use case: Undo and redo actions
MSS
- The user performs an action within Advis.io.
- The user selects the “undo” command within Advis.io.
- Advis.io undoes the last action taken by the user.
- The user selects the “redo” command within Advis.io.
-
Advis.io redoes the previously undone action.
Use case ends.
Extensions
- 2a. The user has not performed any actions within Advis.io that can be undone.
-
2a1. Advis.io displays a message indicating that there is no action to be undone.
Use case ends
-
- 4a. The user has not undone any actions within Advis.io that can be redone.
-
4a1. Advis.io displays a message indicating that there is no action to be redone.
Use case ends
-
Use case: Creating Appointment for Client
MSS
- The user creates a new appointment for a client, with an appointment name and date.
-
Advis.io confirms the appointment creation and saves it to the client’s profile.
Use case ends.
Extensions
- 1a. The user does not enter an appointment name or date.
- 1a1. Advis.io displays a message indicating that the appointment name and date are required.
- 1a2. The user enters a new appointment name and date.
Steps 1a1-1a2 are repeated until the data entered are correct.
Use case resumes from step 2.
- 1b. Advis.io adds an invalid appointment date.
- 1b1. Advis.io displays a message indicating that the appointment date is invalid.
- 1b2. The user inputs a new appointment date.
Steps 1b1-1b2 are repeated until the date entered is valid.
Use case resumes from step 2.
Use case: Delete Appointment for Client
MSS
- The user inputs the deleteAppointment command and the index of the client to delete it from.
-
Advis.io confirms and deletes the appointment under the client’s profile.
Use case ends.
Extensions
- 1a. The user inputs an invalid client index.
- 1a1. Advis.io displays a message indicating that the client index is invalid.
- 1a2. User inputs another client index.
Steps 1a1-1a2 are repeated until the data entered are correct.
Use case resumes from step 2.
Use case: Selecting a Client
MSS
- The user selects a client index from the list of clients, to display their information and policies.
-
Advis.io displays the client’s information and policies.
Use case ends.
Extensions
- 1a. The user inputs an invalid client index.
- 1a1. Advis.io displays a message indicating that the client index is invalid.
- 1a2. User inputs another client index.
Steps 1a1-1a2 are repeated until the data entered are correct.
Use case resumes from step 2.
Use case: Sorting clients
MSS
- The user inputs the sort command and the field to sort by, as well as an integer to indicate the order.
-
Advis.io sorts the list of clients by the specified field and order.
Use case ends.
Extensions
- 1a. The user inputs a non-integer value to indicate the order.
- 1a1. Advis.io displays a message indicating that the command format is invalid.
-
1a2. User inputs another value to indicate the order.
Steps 1a1-1a2 are repeated until the data entered are correct.
Use case resumes from step 2.
Non-Functional Requirements
- Should work on any mainstream OS as long as it has Java
11or above installed. - Should be able to hold up to 1000 persons without a noticeable sluggishness in performance for typical usage.
- A user with above average typing speed for regular English text (i.e. not code, not system admin commands) should be able to accomplish most of the tasks faster using commands than using the mouse.
- Should be accessible offline so financial advisors can manage client information without internet connection
- Should have a user-friendly interface so that target users can navigate the platform with ease without any technological knowledge.
- Should be a safe and secure platform to prevent sensitive client information from being hacked or leaked out.
Glossary
- Mainstream OS: Windows, Linux, Unix, OS-X
- CLI: Command line interface
- GUI: Graphical user interface
- MSS: Main success scenario
- AddressBook: This term is used to represent where we store all the clients’ information and their respect policies
- Private contact detail: A contact detail that is not meant to be shared with others
Appendix: Instructions for manual testing
Given below are instructions to test the app manually.
Launch and shutdown
-
Initial launch
-
Download the jar file and copy into an empty folder
-
Double-click the jar file Expected: Shows the GUI with a set of sample contacts. The window size may not be optimum.
-
-
Saving window preferences
-
Resize the window to an optimum size. Move the window to a different location. Close the window.
-
Re-launch the app by double-clicking the jar file.
Expected: The most recent window size and location is retained.
-
Displaying a client’s personal details
-
View a particular client’s personal details while all other clients are being shown
-
Prerequisites: List all clients using the
listcommand. Multiple clients in the list. - Test case :
select 1
Expected: Personal details of the client at index 1 will be displayed at the right. - Test case :
select 0
Expected : Client list remains displayed. Error details shown in the status message. - Other incorrect select commands to try :
select,select x(where x is larger than the list size). Expected : Client list remains displayed. Error details shown in the status message.
-
Adding a client
- Add a client to the client list
- Prerequisites: List all clients is currently being displayed in the clients display box.
-
Test case :
add n/John Doe p/98765432 e/johnd@example.com a/311, Clementi Ave 2, #02-25Expected : Name of client added will be displayed in the status message. Client list will be updated to include the added client.
-
Test case :
addExpected : No client is added. Error details shown in the status message. Client list remains the same.
-
Test case :
add n/John Doe p/98765432 e/x a/311, Clementi Ave 2, #02-25Expected : No client is added. Invalid email format will result in email error message to be displayed in the status message.
Deleting a client
-
Deleting a client from the client list.
- Prerequisites: List all clients is currently being displayed in the clients display box. At least 1 client in the list.
-
Test case :
delete 1Expected : Name of client being deleted will be displayed in the status message. Client list will be updated to exclude the deleted client.
-
Test case :
delete 0Expected : No client is deleted. Error details shown in the status message. Client list remains the same.
-
Other incorrect delete commands to try :
delete x(where x is larger than the list size)Expected : Similar to previous.
Editing a client
-
Editing an existing client’s personal particulars
- Prerequisites: Client list is currently being displayed. At least 1 client in the list. Select the particular client with the command
select x, where x is the index of the client to edit. The client’s details will be displayed on the top right display box. -
Test case :
edit 1 p/91234567 e/johndoe@example.comExpected : Name of client being edited will be displayed in the status message. The updated details of the client will be shown on the top right display box.
-
Test case :
editExpected : No client is edited. Error details shown in the status message. Client list and their personal details remains the same.
-
Other incorrect edit commands to try :
edit 0,...Expected : Similar to previous.
- Prerequisites: Client list is currently being displayed. At least 1 client in the list. Select the particular client with the command
Adding a policy to a client
- Add a policy to a specific client
- Prerequisites: Select the particular client with the command
select x, where x is the index of the specific client. The client’s policy list will be displayed on the policies display box. -
Test case :
addPolicy 1 pn/Fire Insurance pd/01.01.2021 pp/1000 pf/yearlyExpected : Name of client at index 1 and name of the policy added will be displayed in the status message. Client’s policy list will be updated to include the added policy.
-
Test case :
addPolicyExpected : No policy is added. Error details shown in the status message. All client’s policy list remains the same.
-
Other incorrect add policy commands to try :
addPolicy 0,addPolicy x(where x is larger than the client list size)Expected : Similar to previous.
- Prerequisites: Select the particular client with the command
Deleting a policy from a client
- Delete a policy from a specific client
- Prerequisites : Select the particular client with the command
select x, where x is the index of the specific client. The client’s policy list will be displayed on the policies display box. Client should have at least 1 policy in the policy list. -
Test case :
deletePolicy 1 pi/1Expected : Name of the client at index 1, and name of the policy at index 1 will be displayed in the status message. Client’s policy list will be updated to exclude the deleted policy.
-
Test case :
deletePolicyExpected : No policy is deleted. Error details shown in the status message. All clients and their personal details remains the same.
-
Other incorrect delete policy commands to try :
deletePolicy 0,...Expected : Similar to previous.
- Prerequisites : Select the particular client with the command
Edit a policy from a client
- Edit a policy from a specific client
- Prerequisites : Select the particular client with the command
select x, where x is the index of the specific client. The client’s policy list will be displayed on the policies display box. Client should have at least 1 policy in the policy list. -
Test case :
editPolicy 1 pi/1 pn/Travel Insurance pp/2000Expected : Name of the client at index 1, and name of the policy at index 1 will be displayed in the status message. Edited policy will be updated accordingly.
-
Test case :
editPolicyExpected : No policy is edited. Error details shown in the status message. All clients and their personal details remains the same.
-
Other incorrect edit policy commands to try :
editPolicy 0,...Expected : Similar to previous.
- Prerequisites : Select the particular client with the command
Appendix: Efforts
-
Overall, we thought the project’s difficulty level was Moderate. We implemented a wide range of features with differing degrees of difficulty and complexity. A thorough understanding of the system architecture was required, as this was necessary in order to extend AB-3 in a way that integrates well with the existing design and features of AB-3.
- Challenges Faced: Because each member worked on many issues and features, the list below may not cover all the challenges faced by the team.
- Having to integrate the list of clients as well their respective policies into the UI, so that the application’s main window can contain both the client list and their policy list.
- The policylist was constructed on top of the existing AB-3 architecture, which required extensive modification and extensions to obtain the desired final result.
- There were many non-code issues such as the checkstyle of each pull requests, which took up a considerable amount of time.
- Refactoring the person class to client was a challenge as it was a core class that was used by many other classes.
- Effort Required:
- The current code base has to be heavily modified for our application.
- A large number of test cases were written in order to cover as many edge cases as possible, and to ensure that the application does not break easily.
- We held comprehensive weekly meetings early in the week to ensure that every developer is well-informed about what is planned for the rest of the week.
- Achievements of the Project:
- Our team created a software product that we believe meets our intended goals.
- Most of the Must-have User Stories were met by our software application.
- Our team has met all set milestones and deadlines.
Appendix: Planned Enhancements
- We plan to make message results more intuitive and helpful to users. Currently, inputting an invalid command will prompt the user with a series of instructions printed in text. We plan to improve this by abstracting out the error message functionality and improving the readability of the message prompts using syntax highlighting.
- We plan to improve the UI by accommodating to long names or text on the UI. Currently, blocks of text will be truncated with the use of ellipses when the text length is too long or when the application window is resized too small. We will use flex-boxes to display texts such that it maintains readability regardless of the application’s window size.
- We plan to better accommodate the application when the client list is empty. Currently, when the client list is empty, there is placeholder data to represent an empty client label and policy list. We will reformat the client label and policy list such that it allows for null entries to be displayed (i.e. when no client is selected)
- We also plan to have more specific error messages to guide our users when they make incorrect inputs. For example, if the index is greater than the max int, we would inform the user that “the index must be within the bounds of 2,147,483,647”, instead of currently only informing the user that the command has an invalid format. This would be done by throwing another Parse Exception in the case that the index is more than the MAX_INT value, and outputting a specific exception message in the message box.
- We plan on implementing a log-in/sign-up feature where users can log into personal accounts. This will require the use of maintaining a cloud-based server such that users may retrieve their own data on the go.
- We plan on implementing an administrative user interface. This administrative control will allow management of the company to control the types of policies which users (financial advisors) my key into the application.
- We plan to the ability to
clearthe filtered list fromfind. Now if we callfindto get the filtered client list and callclearwe will clear the entire original client list which might not be very intuitive for the user. - For the sorting commands, which are
sortClientEmail,sortClientName,sortClientPhone- we plan to fix a feature flaw such that the index the user can put in is only binary. Currently, the user can put in any integer and the command will still work. Only if the user puts the index as 0, it will be in descending order. We plan to fix this such that the user can only put in 1 or 0. If the user puts in 1, the list will be sorted in ascending order. If the user puts in 0, the list will be sorted in descending order. This will make the command more intuitive for the user.